Items and SubClips
Items in the system are represented in collections and search results as “Pods”. These pods can be clicked on and will take you to the Item page, examples of items are:
Videos
Images
Audio
Documents
NLE Projects files
Binary files
Placeholders (items not containing any files)
Items are created by ingesting content, creating placeholders and auto importing files.
To learn about how to create Items, see the Creating and Ingesting Items documentation.
Items can reference one or more files, which are often different encodings of the original Item. These different encodings are referred to as Formats.
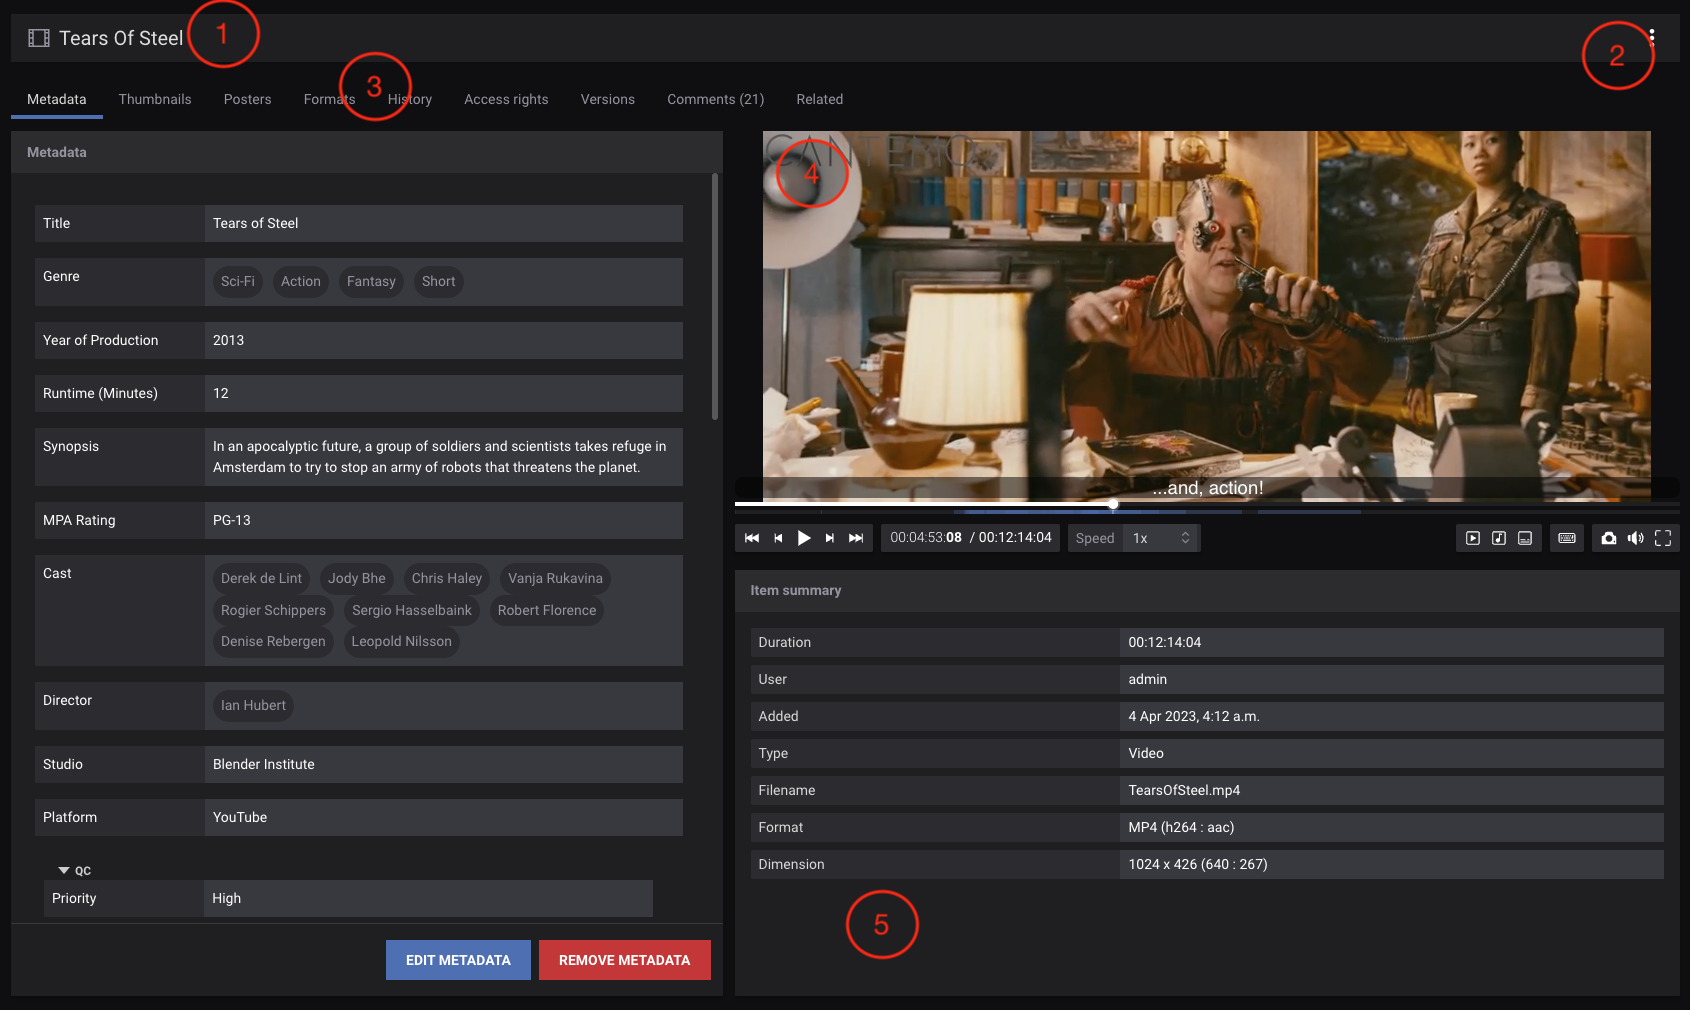
Item Page Overview
If you have write access to the Item, you can change the title by clicking here and saving it.
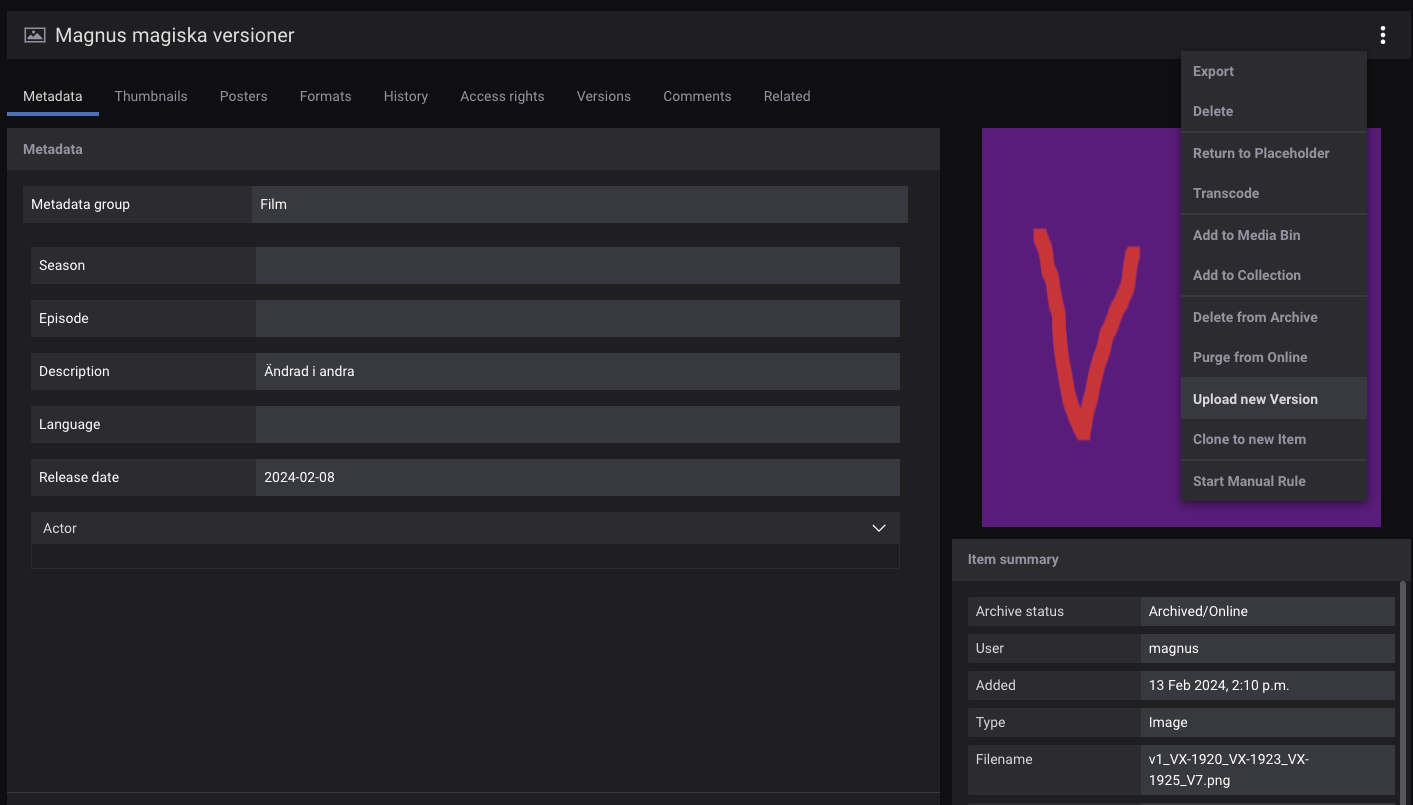
Operations can be perform on the current Item by clicking here.
Different views of the Item can be shown here.
If previews of the media exist, they are shown here.
Technical metadata derived from the file is shown here.
The page layout can be changed by dragging the separators between the different areas to for example show a larger preview or more metadata.
Depending on the type of an Item, the view may be slightly different.
Placeholders
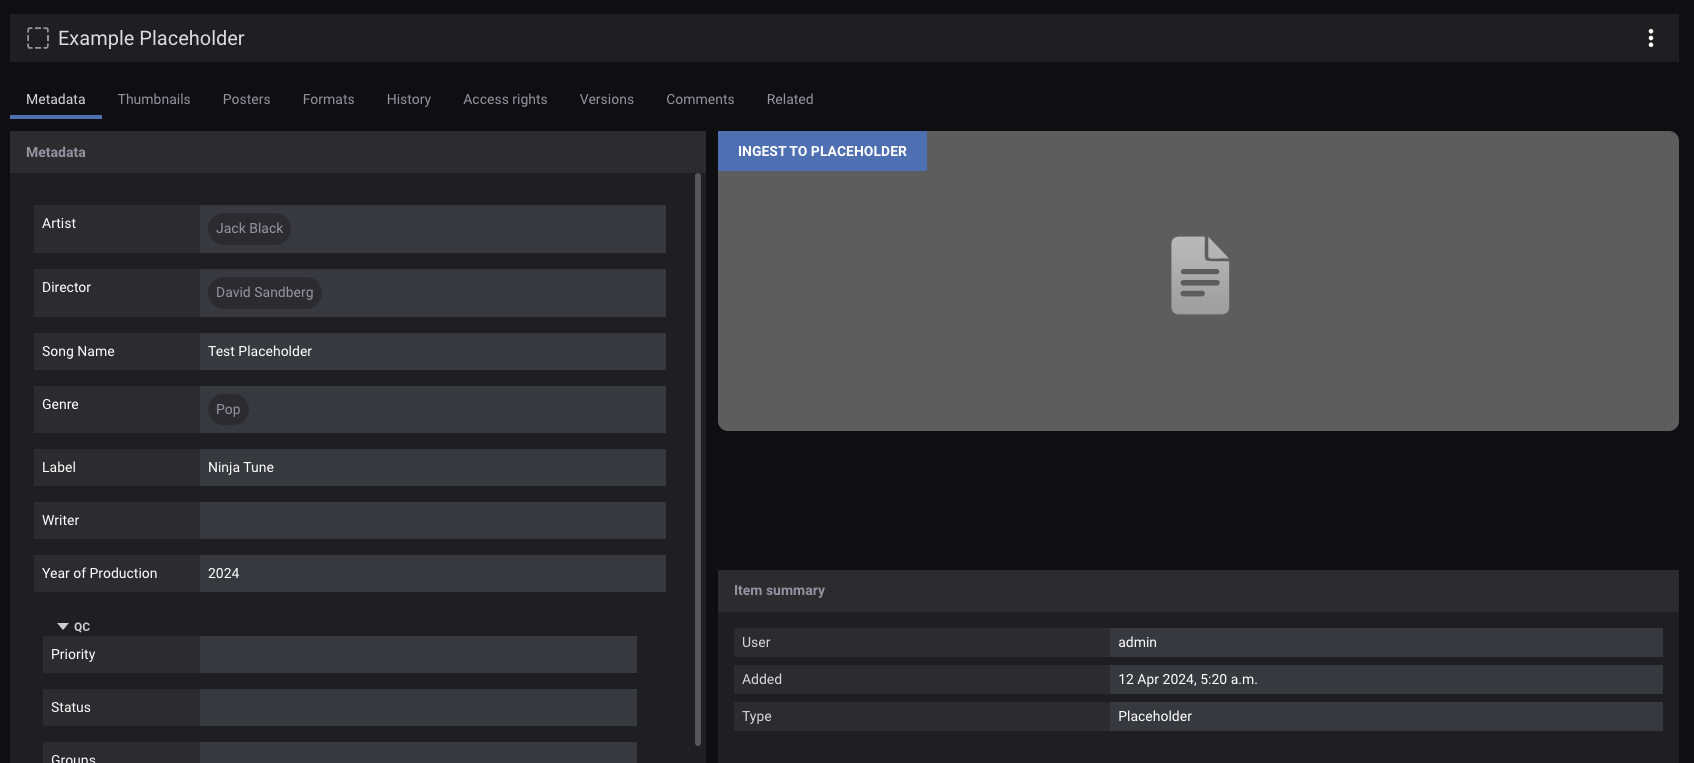
A placeholder containing metadata and access rights with no Item.
A placeholder is a Item without a file (or any Formats attached) but just an empty container to be associated to a file. It can have all the other attributes a Item has, including Access Control Lists (ACLs), Relations and Metadata.
A file can at a later date be associated to a placeholder by clicking on the “Ingest to placeholder” button where the media preview usually is to which allows you to choose a file from storage. Please note that this button is only visible if you have write access to the placeholder.
Previews
Certain media types can utilize a preview of the Item if the Item has the correct Format created.
- Video previews
Can be played through the built-in player, you can scrub forwards and backwards, pause. Fullscreen playback is supported. Multiple audiotracks and subtitles are also supported.
The player has a number of advanced keyboard shortcuts, click on Show hotkeys -button below the player for more information.
- Audio previews
Can be played through the built-in player, you can scrub forwards and backwards and pause playback.
- Image preview
Can be viewed as any other image. Click on the image to show it full screen.
Metadata
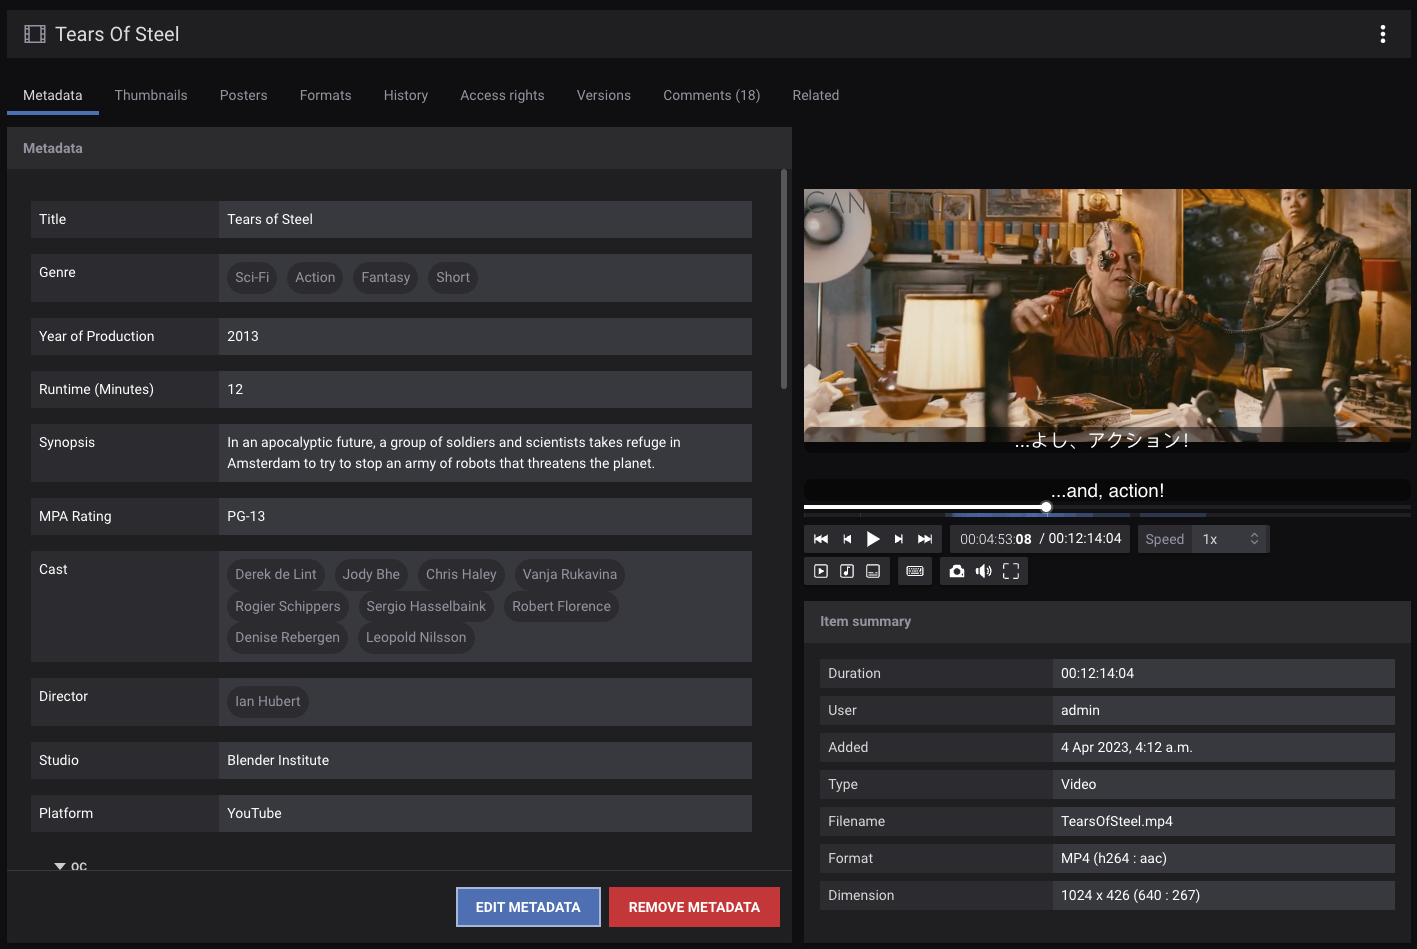
Item metadata can be viewed and modified based on your access to the Item.
Metadata can be associated to an Item. If the Item has no metadata group associated to it then you will be presented with your default metadata group which you can fill in. You can also change the metadata group if you have access to multiple groups.
Metadata can either be viewed or if you have the write access to an Item you can edit the metadata form on an Item.
The title of the Item can be changed by clicking on the title at the top of the page.
For more information on metadata please see the Metadata documentation.
Formats
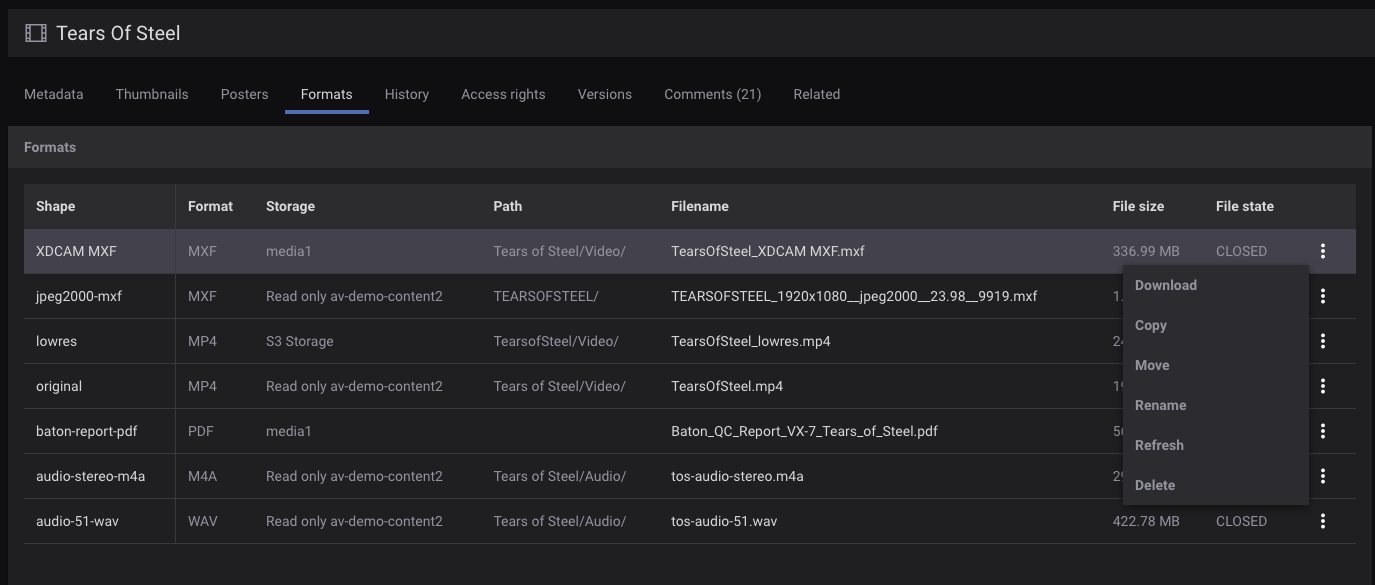
Download or delete formats based on your access to the media item.
One Media Item can have many associated files with it, these associated managed files are presented in the Formats pane as different versions of the same item such as the original file, low resolution previews and other versions of the file that can be generated.
For example if you upload a video, this is referred to as the Original. New formats can be created of the Original by transcoding to different formats.
Different Formats can also be downloaded and exported from the system, or when you choose to export, new Formats could be dynamically created.
It is advantageous to let the system create, store and move Formats when needed, rather than try to manually manipulate this. Your system administrator can create dynamic rules for your group to automatically create these formats upon ingest.
Thumbnails
Thumbnails are auto-generated for supported Formats, and are shown in the thumbnails pane. They can be regenerated from the transcode menu.
Posters
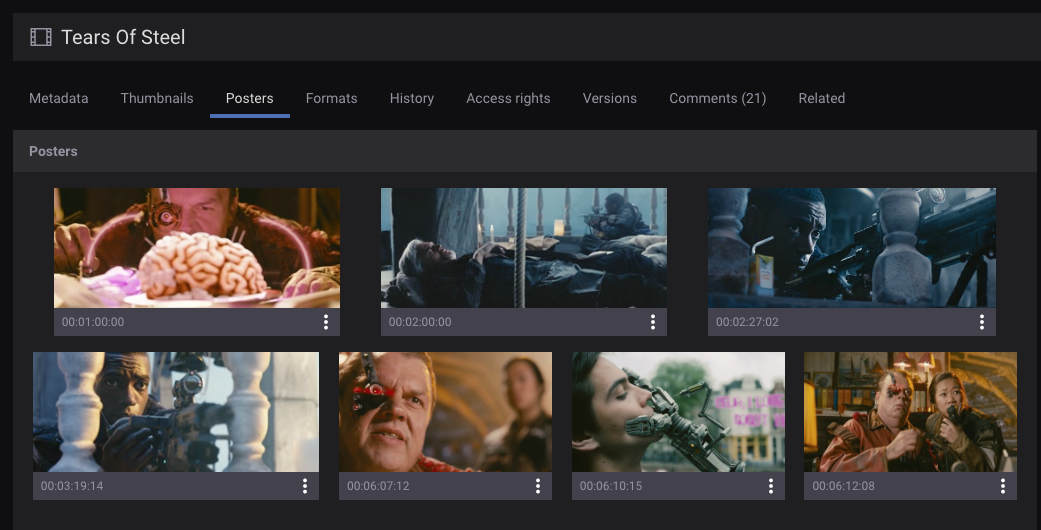
Poster view.
Posters are still images created from video media at a particular timecode. They are created as a jpeg at the largest size possible from the source media, and they are shared with all users that have access to see the thumbnails and media of an item.
You can create a poster by seeking to a timecode in the player and then clicking on the camera icon in the player. The still image will then be queued for creation by the transcoders, who need to read the original file and then create the image.
Once completed and ready posters can be viewed by clicking on the Poster tab on the right which will open a grid of thumbnails of the each of the posters available for this item (a thumbnail is always created at the same time as the poster). Below the thumbnail is the timecode from when the poster was taken, and a small download icon is visible to the right. Clicking on this small download icon will start a transfer to your browser, or alternatively right click and save the target (the terminology and behavior differ between browsers, but all should allow you to download if you have the right to).
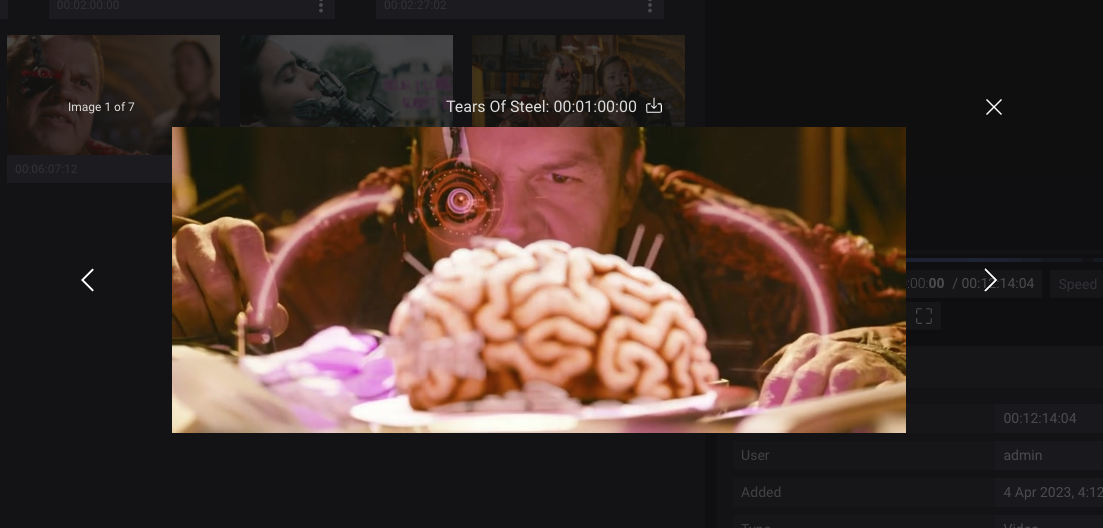
Use the viewer to view large poster frames quickly and easily.
If you click on the small thumbnail of a poster it will open a large screen viewer of the poster images. Left and Right arrow keys can be used to jump between posters if there is more than one available.
Delete and Download actions is available in the action menu of each poster.
Transcoding
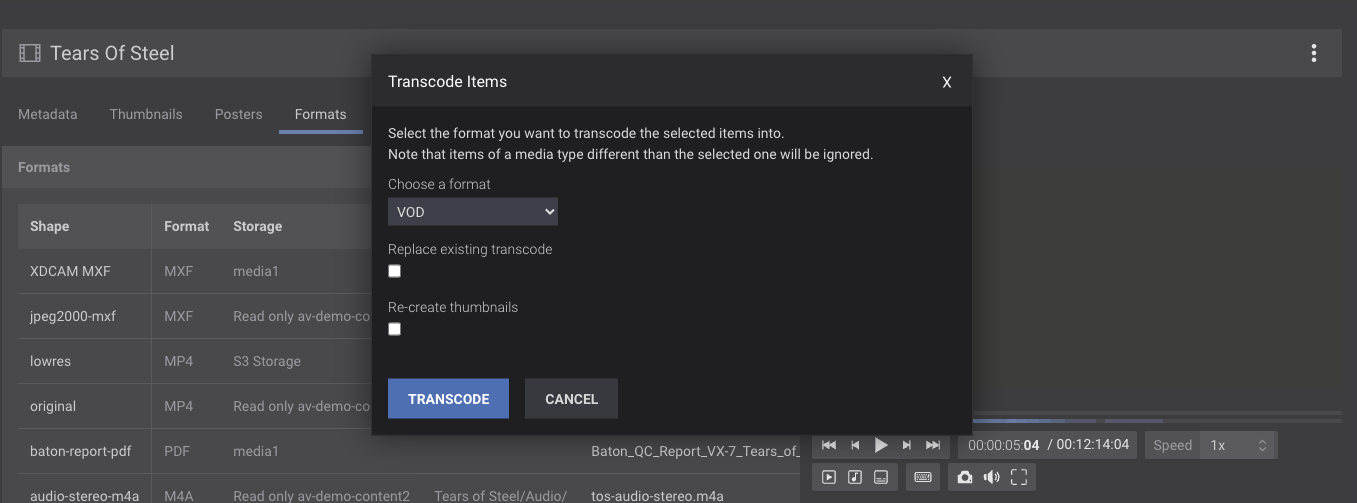
Transcoding allows you to create new Formats of the same Item, or to retranscode existing Formats. The transcode profiles are created by administrators to define specifications for the transcode. Simply choose the transcode profile and the system will transcode the Original into the new format from the original file.
You system administrator should have details on the specifications set up for the transcode profiles, and be able to inform you on which profile to use and when.
Importing files in to the system can trigger automated transcoding to create previews and other Formats you need.
Thumbnails can also be recreated at the same time as transcoding.
Exporting
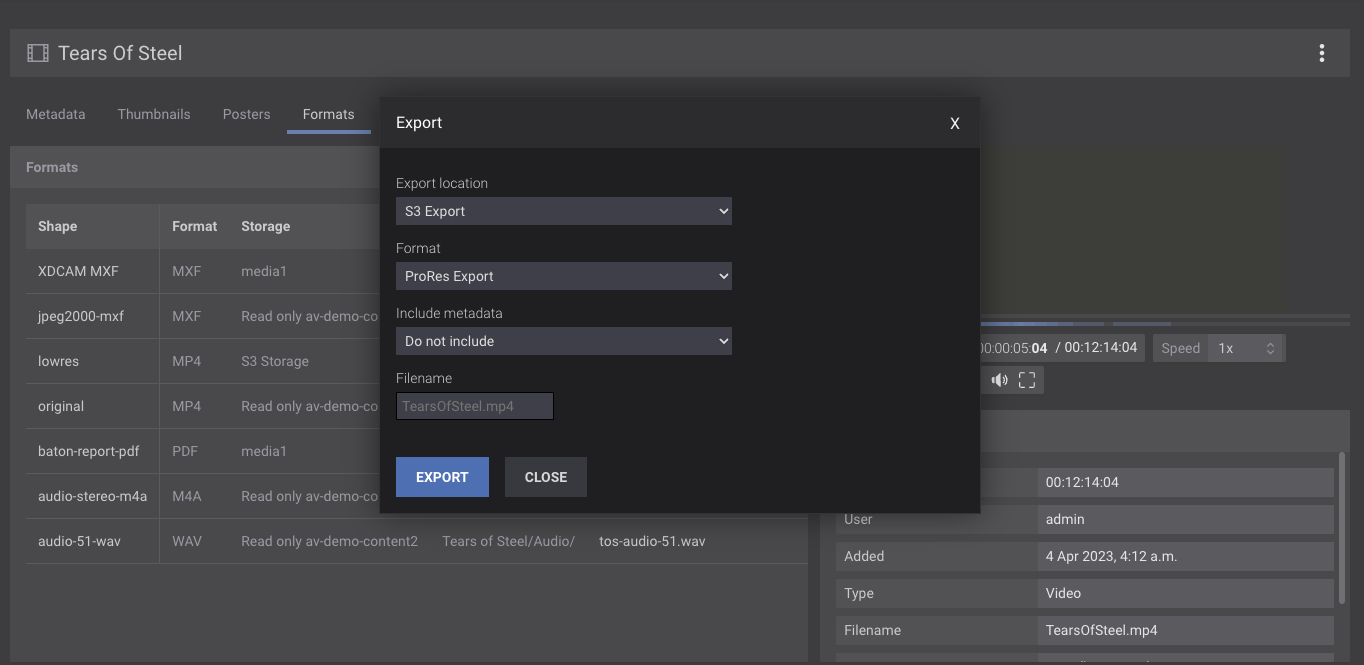
Export the media to predefined export locations.
Exporting can export a Format to a predefined location set by the administrator. You can also choose to export the metadata at the same time as the file. The choices for the metadata are different projections (translation mappings) of the metadata of the Item. You may also be able to assign a specific file name for the file to be exported, if the administrator has enabled it for the export location.
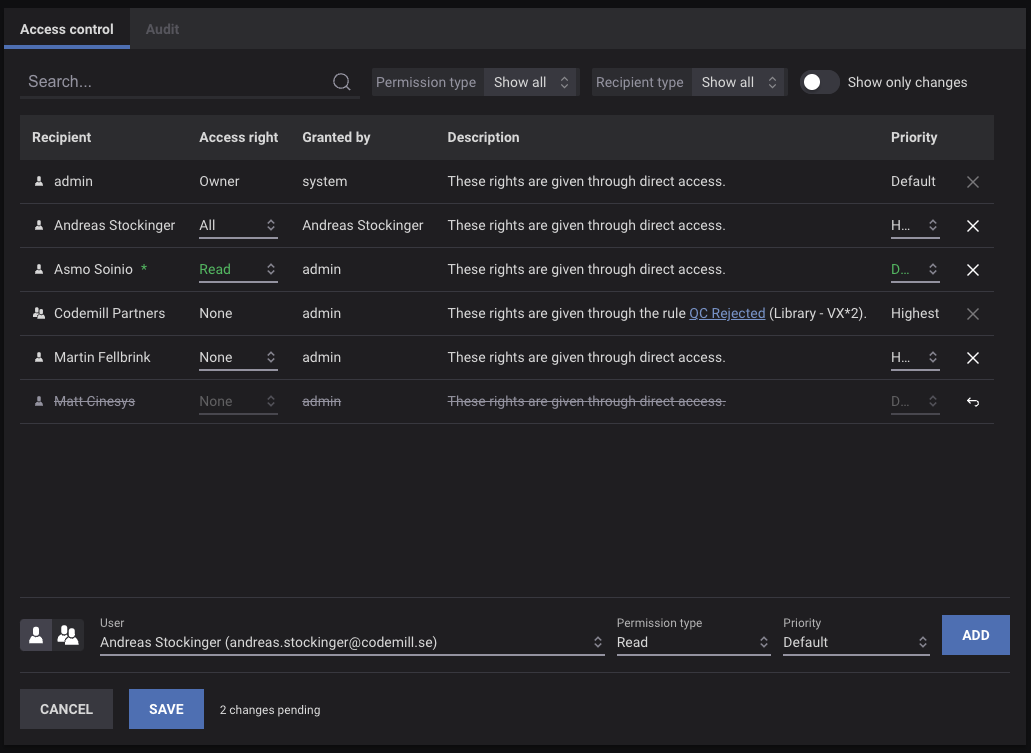
Access Control Lists
Each item has by default an access control list (ACL) associated with it. The original ingestor or creator the item will have the “owner’s rights” (in other words, all read-and-write access). If you want access to an item that has an ACL restricting you from reading or writing to the item, someone with sufficient privileges can add you to the ACL.
To add access rights choose Add Access Rights, select either a group or user and what rights they have.
To remove an ACL click the Manage to the right of the ACL row.
Note
Note that you must have write access to the item to perform the above.
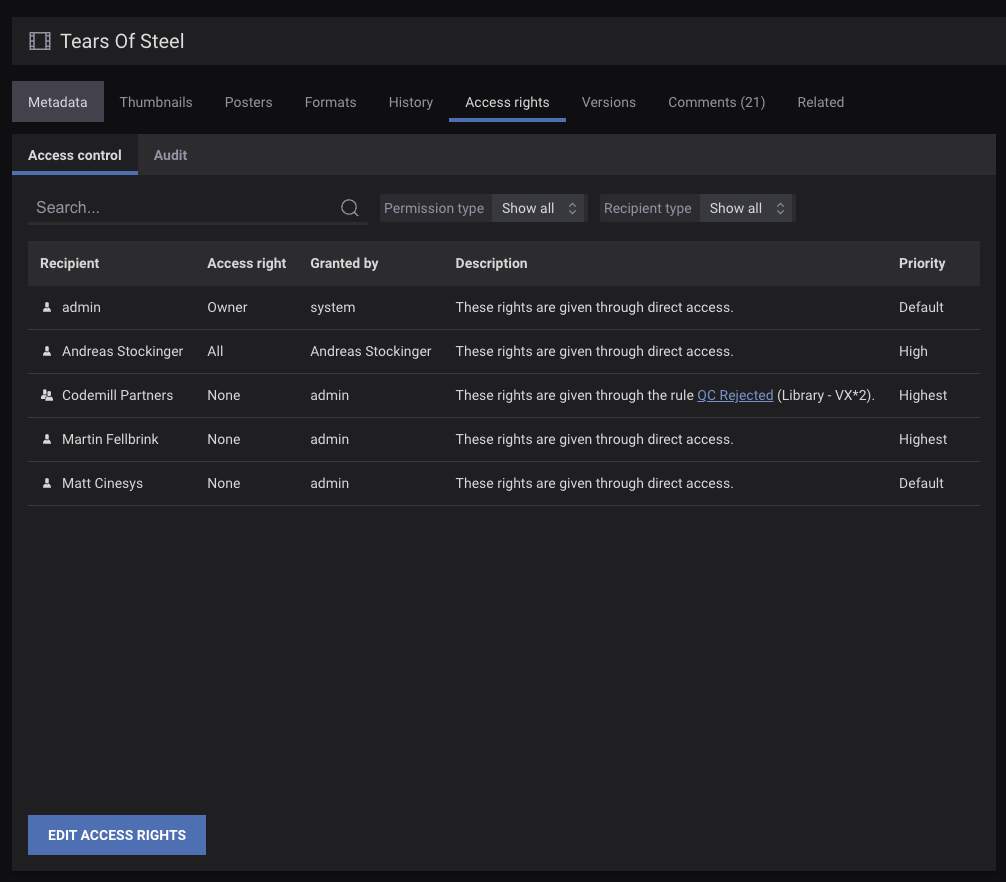
View and modify the access rights to the Item.
The rights that can be applied are:
- None
The user or group will have no rights to read or write to the Item. Overriding all the previous access rights that they might already have.
- Read
The user or group can read metadata and technical metadata and view any previews of the Item, but they can’t change anything.
- Write
The user or group can change and add metadata, transcode and export the Item.
- All
The user or group has complete access to the Item.
Default priority is fine for most of the ACL, but as a system administrator you are allowed to override those.
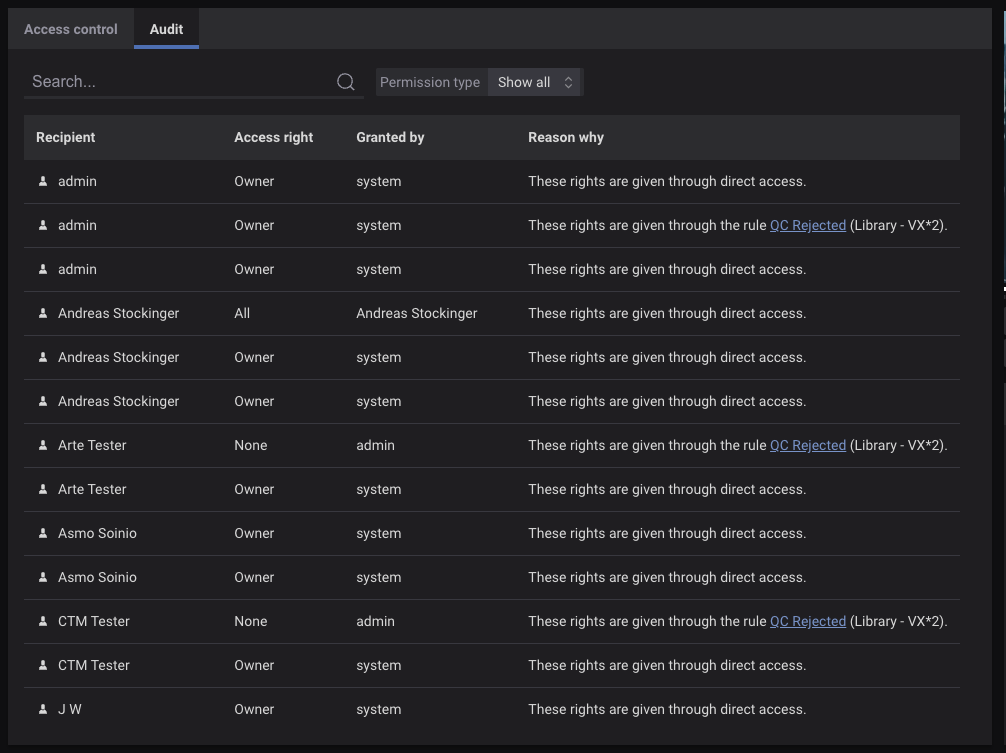
You can see which user has which access through the audits menu.
Click on Edit Access Rights to add rights to new groups or users, or to remove them. Click on Save to apply the changes.
Versions
Versions can be used to have multiple versions of the same media, especially useful for Final Cut and Premiere projects.
You can also upload a new version of a file, or promote an old version to the newest version.
Delete
Items can be deleted using the delete functionality. It will remove all references to the item, its ACLs and its metadata and certain versions of the file.
Download
Items can be downloaded using the Cantemo Agent. This will download the original file and Cantemo Agent needs to be installed and configured.
History
You can view a history of the item, and what has happened to it by whom.
Subtitles
If a video item contains subtitles, these can be displayed in the Item Page video player. Below the video player is a selector for subtitles.
Multiple video tracks
If a video item contains multiple representations of the same video you can choose which one you want to display from a selector below the player, as with the subtitle selector. These representations can be different bitrates or other configuration the administrator has configured.
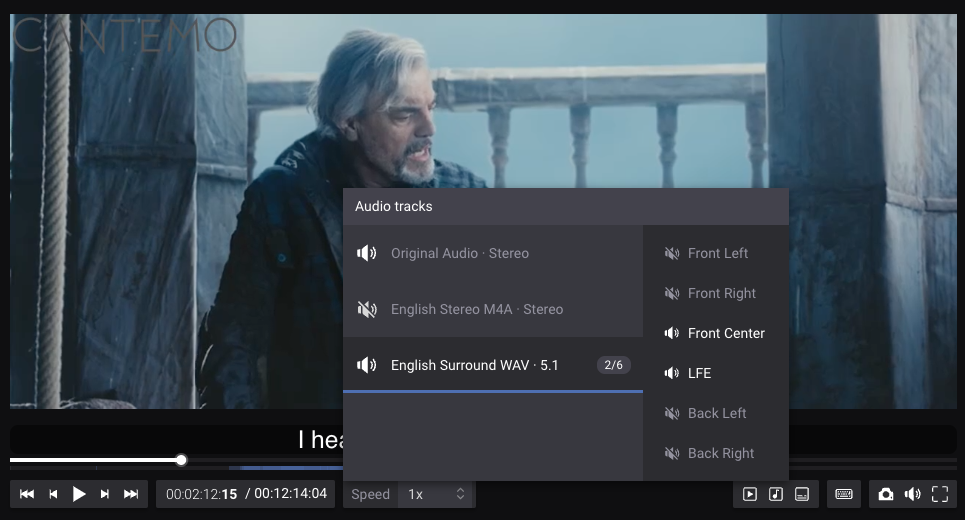
Multiple audio tracks
If a video item contains many audio tracks, these can be enabled and disabled below the player, as can be video tracks and subtitles. Additionally user can enable and disable individual channels from any of the tracks.
These tracks can be either from discrete files or embedded into the video track being played.
A video with subtitles and multiple audio tracks with multiple channels.
Return to placeholder
If media was ingested to a placeholder by misstake, you can use the “Return to placeholder” functionality to make the item into a placeholder again. This will keep the Item’s metadata, including any timed metadata (annotations) but will remove all thumbnails and disassociate the media. The media file will be returned to the “Import from storage list”, making it possible to ingest the same media into the correct placeholder.
Sharing
Note
Sharing can be turned off by Administrators.
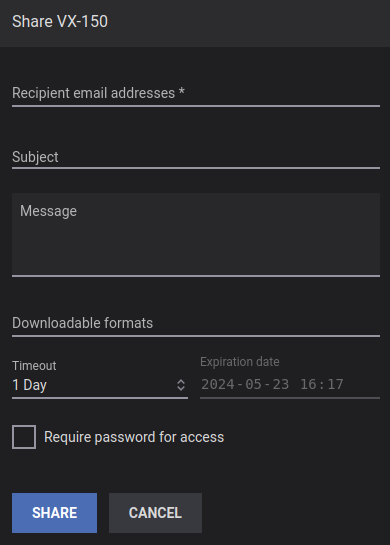
If Sharing is enabled on your system you can send out an email so that others can get a secure link to the media so that they can review the clip. If they are logged in they will also be sent to the same area, but they can get a link to the item that has been shared out so they can view it in the normal item page.
Optionally the administrator can choose whether comments are enabled for shares.
To create a share, open the menu and choose “Share”. This will open a dialog with some of the following options. The options are:
Recipient email address
This is a list of email addresses that this share sent to.
Subject
This is the subject line that be used in the email(s) that will be sent out.
Message
This is the message that be used in the email(s) that will be sent out.
Downloadable formats Select which file formats that should be available to download to the user.
Timeout
For the share you can enter how long the link will be valid before timing out. After the link has timed out it is no longer valid.
You can either select a predefined timespan, or choose “custom” and select a specific date and time.
Password
This is optionally enforced by Administrators. If you set a password the user must enter the password when they go to the link. You can click on the quill icon to get a password generated for you.
Share button
Click this to send out the shares. When you click this the system will create a unique link for each recipient, and send out unique emails to each recipient, this way we track who accesses the links.
Please note that the Administrator can set up minimum and maximum timeouts on links. They can also choose whether comments are enabled, whether passwords are enforced and how the messages that can get sent.
Comments
Comments allow you to create a threaded dialogue with other users of the system about the item or subclip.
Users of the system can either be internal registered users, or if the sharing functionality is configured these can share recipients that have commented on the system.
Click on the comments will show an overview of all the comments on the current item / subclip. The comments link should also show the current number of comments on an item if there are more than 0.
Commments are threaded so that you can reply to an existing comment or use the comment form at the bottom to add a new comment.
To add, write your comment and then press post. The comments are reloaded and you can see your comment.
If you have entered a comment you can click on the comment content to edit it again. The date that you have updated will be stored in the system.
There is a Direct Link to the item with the comment so that you can copy that into external applications such as email.
A Delete link also can remove the comment from view. If you need an administrator can un-delete the comment.
Timebased comments
You can create timebased comments with an in and out point to describe a certain section of the Video
To choose in and out points: Use hotkeys
IandO, drag the selector on the player timeline, or enter values into the timecode entries next to the comment box.