Active Directory Integration
The purpose of the Active Directory Integration is to allow for scalable user management for installations which already have and existing user directory in place. The Active Directory Integration is primarily built for integration with Microsoft Active Directory, but integration with other LDAP Directories such as OpenLDAP is possible by changing the advanced settings.
Directory requirements
An LDAP directory can be configured in many different ways and some assumptions has to be made when querying it. This section tries to outline the assumptions that are made on how data is organised in the directory.
Each user has a username which is available in a single attribute and which is unique in the directory.
Each group has a name which is available in a single attribute and which is unique in the directory.
Each group has a list of members that are referenced by their distinguished name.
Groups can either have users or groups as their members.
There is one common base path under which all users can be found.
There is one common base path under which all groups can be found.
The directory supports simple bind.
Updating portal.conf
The Active Directory Integration includes an authentication backend
which has to be enabled in portal.conf. This backend implements
authentication against the directory servers and is required for a
working integration.
To enable, open the file /etc/cantemo/portal/portal.conf in your favourite editor and make sure the following line
is included in the section [enable_extras]:
AUTHENTICATION_BACKENDS =
     portal.plugins.activedirectory.authentication.ActiveDirectoryBackend,
     portal.vidispine.authentication.VidispineBackend,
     django.contrib.auth.backends.ModelBackend
The order of the the list is the order of authentication. The above example will say first try Active Directory, then Vidispine.
Note
Make sure you restart Cantemo after modifying portal.conf. The order of authentication backends is important, if Active Directory has been enabled that has to be placed before VidispineBackend.
Configuring the integration
Once installed, you will find an Active Directory menu option in the Admin menu. This option will take you to the configuration wizard.
Only three settings are required to set up the integration. These are a domain name and a username/password for a user which will be used to look up entries in the directory. This user could preferably be a user with limited access as the only permission which is required is that they can look up users and groups in the directory. The user does not require write permission to the directory.
Required settings
Domain name - This is the DNS domain name of your directory. An example of this could be ad.example.com
Username - The name of the lookup user
Password - The password of the lookup user
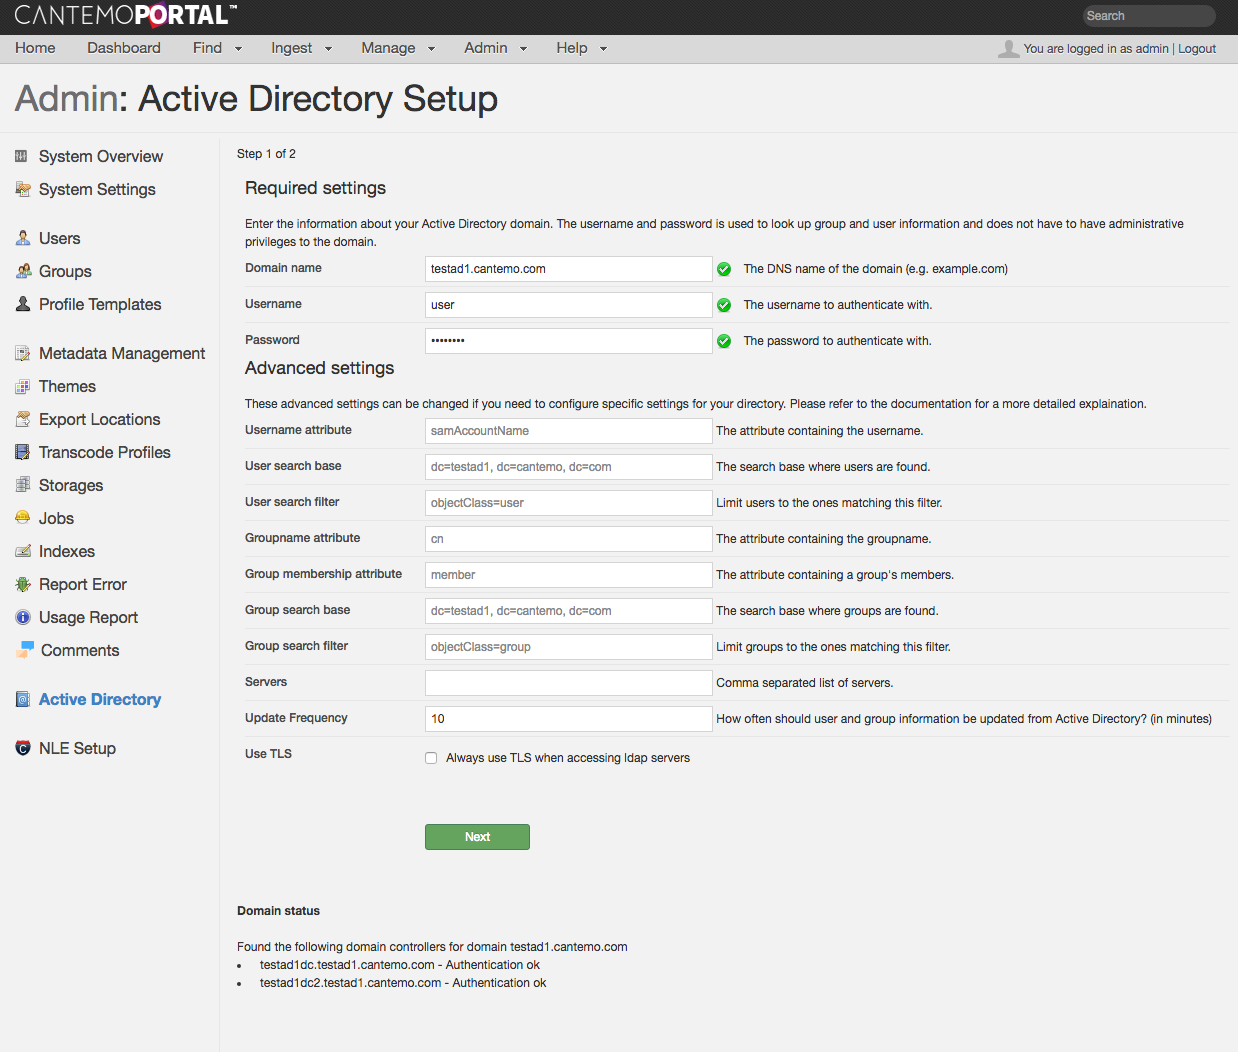
Configure required and advanced settings.
Advanced settings
The defaults provided are suitable for a Microsoft Active Directory installation where you do not want to limit searches to a specific part of a directory. If you want to configure the app for integration with another LDAP directory or want to limit which objects are searched then you may have to change some of the advanced settings. Please refer to you directory’s instruction manual for the proper values.
Username attribute - The LDAP attribute which contains the user’s username. For an Active Directory the default is “samAccountName” but other directory servers may use attributes such as uid or username.
User search base - Where in the directory a search for users should start. The default is to search the entire directory, but you can limit the search to only specific subtrees.
User search filter - An ldap search filter which matches user objects in your directory. For many directory softwares this is “objectClass=user” but other examples could be objectClass=posixAccount or objectClass=inetOrgPerson
Groupname attribute - The LDAP attribute which contains a group’s name. The default is “cn”.
Group membership attribute - This is the attribute on a group which contains all the members of that group. The default is “member”
Group search base - Where in the directory a search for groups should start. The default is to search the entire directory, but you can limit the search to only specific subtrees.
Group search filter - An ldap search filter which matches group objects in your directory. For many directory softwares this is “objectClass=group” but other examples could be objectClass=groupOfUniqueNames or objectClass=directoryGroup
Servers - A comma-separated list of server names to use as LDAP servers. This will override the automatic configuration via DNS. Servernames can be specified on the form hostname:port if a non-standard port is used.
Update Frequency - How often should user information be updated from Active Directory. By default this is updated every 10 minutes when a user logs in.
Use TLS - Forces all comunication with the LDAP servers to use TLS, even if the DNS records specify otherwise. See TLS Connection Issues if you are unable to authenticate after enabling this option.
Once you have completed the first page of the setup wizard, press the Next button to go to the second page.
Settings for specific directory servers
This section lists the settings you should set in the advanced settings for specific directory servers.
Microsoft Active Directory
Username and Password must be specified when integrating with Active Directory. Apart from that, the default settings should suffice and allow all users in the directory to log into Cantemo.
Apple Open Directory
Username - If your directory requires authenticated bind, the full DN of a user must be specified here.
Username attribute - uid
User search filter - objectClass=posixAccount
Group membership attribute - memberUid
Group search filter - objectClass=posixGroup
Groups and roles
On the second page of the wizard you will be able to set up group and roles settings.
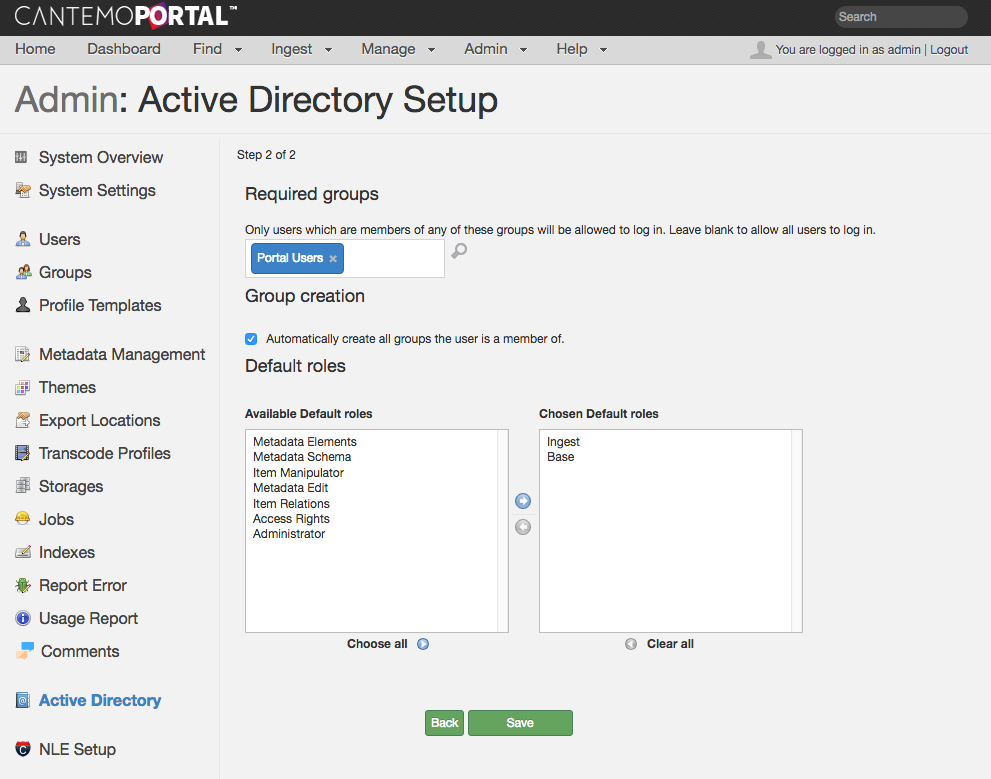
Configure required and advanced settings.
Required groups
If you have a directory with many users, only some of which you want to allow access to your Cantemo installation, you can configure a list of required groups. Only users which are members of any of these required groups will be allowed to log in to Cantemo. If you leave this list empty, all users in your directory will be allowed access. Note however, that the license requirements are still enforced and once your total number of licensed users have been created, no new users will be allowed access.
Automatically create groups
By default, Cantemo will not create any groups from Active Directory. Instead, when you manually create a group via the built-in group management, you will get suggestions for group names from Active Directory.
If you want the integration to automatically create groups for you, then you can select the checkbox and select any roles you want newly created groups to have.
If a group is created manually in Cantemo and later created in Active Directory then it will maintain its configuration as set by the administrator, but the group’s membership will be updated to reflect the hierarchy in Active Directory.
Troubleshooting
Integrating with external systems is often a complex task. We have tried to automate as much of this task as possible by providing useful default values but each directory server installation is different so many things can go wrong. In this section we have provided information on how to find out what goes wrong when the integration doesn’t work.
Setup
During the setup, a number of checks are performed against your active directory to ensure that the configuration will work properly once saved. On the first page of the setup wizard, you will see the status of these checks as green check marks next to the input boxes which are verified, as well as in an information box below the input form.
Could not find any domain controllers in DNS for domain example.com
In order for your domain to be found, it must be registered in DNS. The Active Directory Integration app looks for the DNS entry _ldap._tcp.example.com for a list of domain controllers (replace example.com with your domain name). A Microsoft Active Directory installation will automatically create these entries for you during installation. A failure to lookup the DNS entries will be indicated by a red icon next to the domain name input box as well as an explanatory message below the input form.
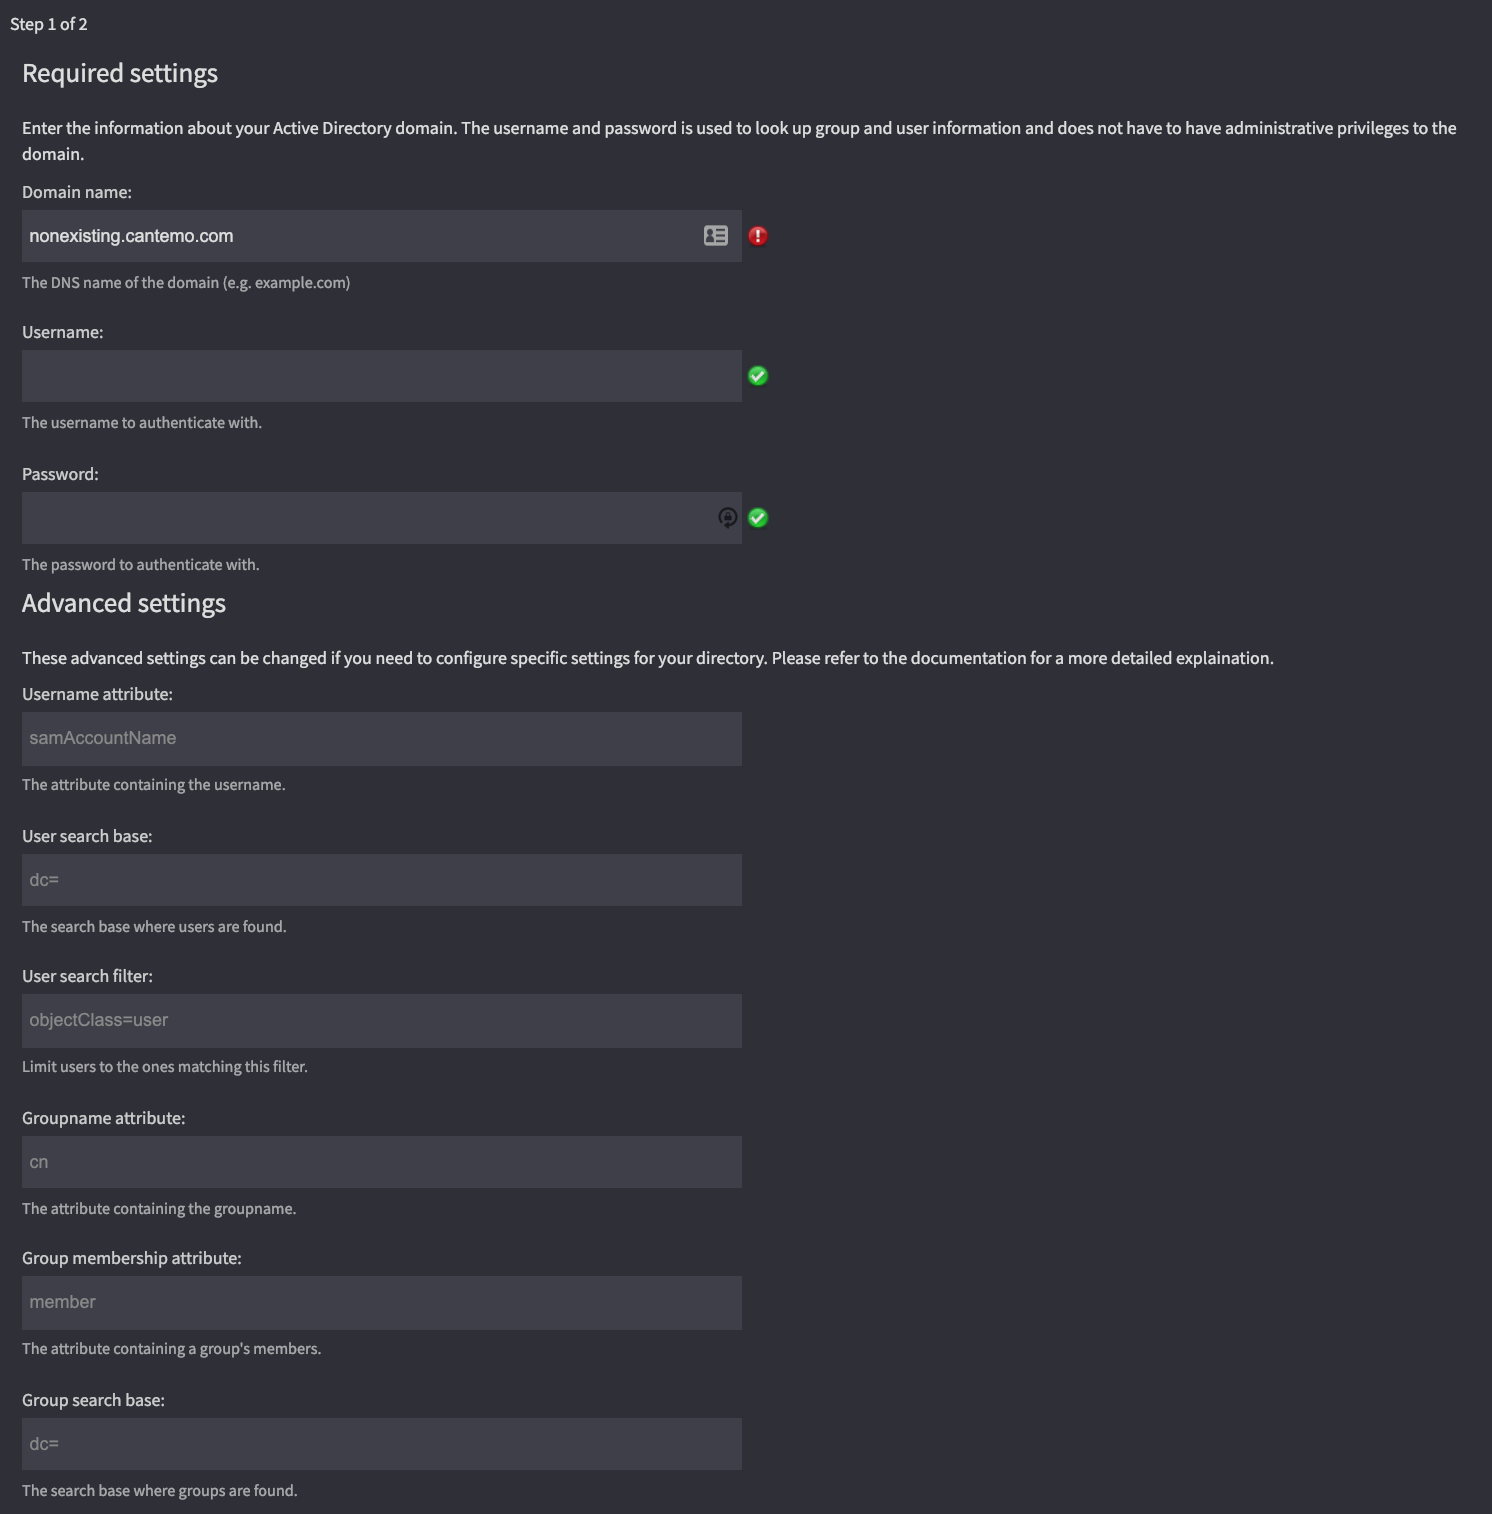
An example of a failed DNS lookup.
To verify if your DNS is set up properly:
$ nslookup
> set type=srv
> _ldap._tcp.example.com
Server:         8.8.8.8
Address:        8.8.8.8#53

Non-authoritative answer:
_ldap._tcp.example.com  service = 0 100 389 dc1.example.com.
_ldap._tcp.example.com  service = 0 100 389 dc2.example.com.
This shows that the two servers dc1.example.com and dc2.example.com are listed as domain controllers for the domain example.com
Example of a failed lookup:
> _ldap._tcp.example.com
Server:         8.8.8.8
Address:        8.8.8.8#53

** server can't find _ldap._tcp.example.com: NXDOMAIN
No such name in DNS
This means that the domain controller was included in the list of domain controllers in DNS but the Active Directory Integration was not able to find the host itself in DNS. Please contact your domain administrators for assistance.
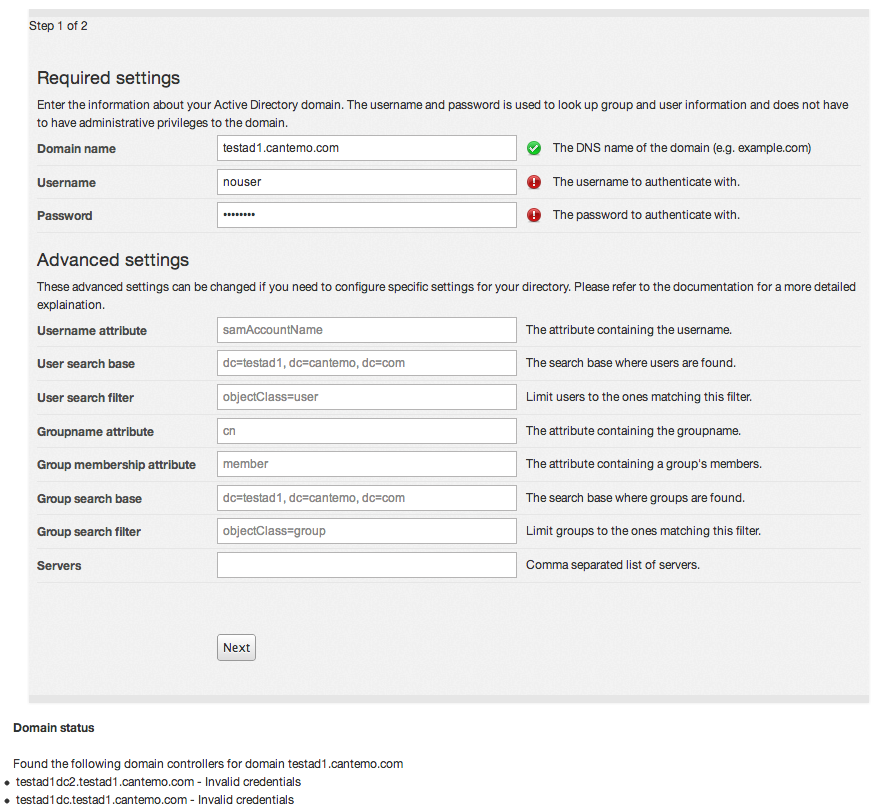
An example of a domain controller which cannot be found in DNS.
Can’t contact LDAP server
This means that an attempt to connect to the domain controller failed. There can be many reasons for this, incluing networking problems, firewalls or access controll lists on the domain controller. Please contact your domain administrators for assistance. There can also be more informative log messages in the file /var/log/cantemo/portal/portal.log on the Cantemo server.
Invalid credentials
The username and/or password you supplied was incorrect. Please contact your domain administrators to verify that the credentials are correct.
TLS Connection Issues
If you are requiring TLS when connecting to the LDAP server, and see error messages similar to the following then it is likely that you are using a certificate which is signed by a certificate authority (CA) not included in the operating system’s list of trusted certificates.:
TLS error -8179:Peer's Certificate issuer is not recognized.
In order to configure the CA-certificate you will need to edit the file /etc/openldap/ldap.conf and change or add the line:
TLS_CACERT /etc/openldap/cacert.pem
You will have to add the CA-certificate to this file in PEM format and make sure it is world readable (the public part of the certificate is not security sensitive). After a restart of Cantemo you should be able to connect to the LDAP server using TLS. Please note that the TLS_CACERTDIR configuration variable in ldap.conf does not work due to the ldap library used in Python.
Debug
Errors that occur during operation are logged on level INFO or above. However, some messages are logged on debug, to decrease the size of the log files during normal operation. Please see the Cantemo Installation for instructions on how to change the log level.
It is also possible to enable low level LDAP debugging by adding the following to the file /opt/cantemo/portal/portal/localsettings.py:
import ldap
ldap.set_option(ldap.OPT_DEBUG_LEVEL, 4095)
This will cause openldap debug information to be printed to the standard output from the Cantemo process. You use journalctl to inspect the logs:
journalctl -u portal-web
Reporting errors
If you encounter an error you cannot fix yourself, please feel free to contact Cantemo Support. In order to assist you more quickly, please include an error report using the “Report Error” tool available via the Admin menu in Cantemo.