Themes Overview
Themes allow for having more than one look and feel on a Cantemo site, targeted down to the individual user. Users can be allowed to change the theme that they see, or that can be restricted to an Administrator to set it for them.
The standard theme deployed with Cantemo is called core.
Users are associated with a theme, with a default theme for the whole site.
Themes can inherit from the default theme, so that templates don’t have to be replicated across whole directory structure. This makes it easier to target specific areas of the site that you want to customize without having the overhead of maintaining multiple copies of the same file.
A theme also has a link to the master CSS file holding the root CSS for that theme.
Each theme should also have a logo associated with it.
If you decide to create your own theme please read the following sections carefully. This is a basic checklist of what you need to do:
Create a folder with a template subfolder in the portal_themes directory.
Create a new theme in the Administration Interface.
Copy the template that you wish to alter from the core theme to your own theme.
Change the CSS.
It is recommended that you place our core theme in to some kind of version control system alongside the .less files from portal_media folder for core. Then you can create your files from here. When we update the themes and stylesheets you can check these into your version control system and do a diff to see what has changed from the last time.
Theme Files
The theme files are kept in the portal_themes directory and should have the following structure:
portal_themes/
....theme_name/
.........templates/
.............theme.html
If the admin has set THEME_USER_CHANGE to True in the ``portal.conf` settings, users can choose themes for themselves from those themes that are allowed in the THEME database. Otherwise it is up to an administrator to set the theme for a user from the user administration page.
You can have as many template directories as you wish, however there is always only one site-wide default theme.
Admin Theme Files
In the portal_themes directory there is a admin folder structure. This is for overriding the main django admin screens incase any apps start using these.
Static Media
Static media such as Javascript, CSS and image files is served from the portal_media/ folder. This is referenced by the {{ STATIC_URL }} context variable.
If you want to place your static media for your theme, you can do the following
Place your content in a folder such as
/opt/cantemo/portal/portal_media/your_theme_name.In your theme HTML templates reference those files by using the
{{ STATIC_URL }}context variable, and example is:<img src="{{ STATIC_URL }}your_theme_name/img/example.png" />
Make sure that the
{{ STATIC_URL }}is set to point to the correct directory.
Theme Logo
The theme log allows an Administrator to upload a file to be used as a logo in the Web Interface.
The users current theme logo is resolved with the {{ themeobject.logoimage }} context variable in the .html templates. Its available everywhere but it is generally used in a file that forms the header for almost every page in the interface.
Upload the logo for the current theme by visiting the Admin area, Themes, and then choosing the theme that you wish the logo to be changed for.
Theme Logo Retina
If you want to target devices with your theme logo that support a pixel ratio of more than 1x - (such as Apple MacBook Pro retina, iPad 3+, iPad Air and iPhone 4+) then you can do this by setting the Retina Image as well. Create an image 2x the size of your normal theme logo and upload it the same time as the normal theme. Then set the logo width and logo height to the width and height of your standard theme logo.
The information can be resolved under the {{ themeobject }} context variable in templates.
In the Core theme Retina logos are only shown when the width and height is set.
Template Resolution
This will include the template from the users theme if they have one, if not it will take the site’s default theme and try and serve that file. If the current user requesting the page that is using that include above, and they have their theme set to “dark” it will try and look up the template in:
portal_themes/
....dark/
........templates/
............media/
................media_inc_preview.html
If that doesn’t exist the theme will try the sites default, such as:
portal_themes/
....core/
........templates/
............media/
................media_inc_preview.html
If the is_default template is not available the template resolver will try and fallback to core. If the template then doesn’t exist a TemplateDoesNotExist exception will be raised.
Theme Attributes
Each theme has a number of attributes that can be set by an Administrator of the system. These are asked for in the Administrators Web Interface.
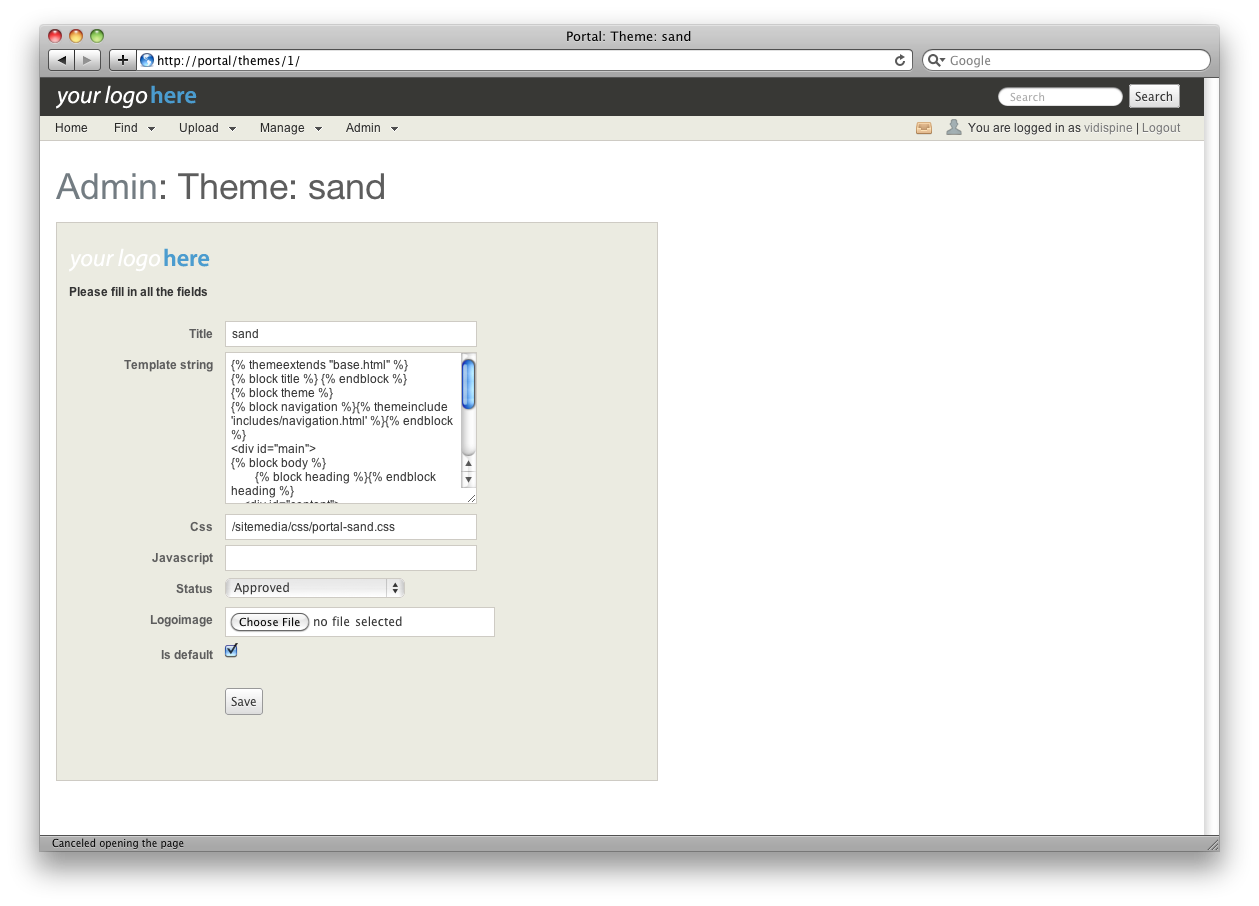
- Title:
This should be set to a name with only letters and underscores, no spaces.
- Template string:
This holds a base template for the theme. More on this in the theme_tags.
- Css:
A pointer to the master CSS file that should be used for the theme. This resolves in a template to {{ cssfile }}.
- Javascript:
Not currently used.
- Status
EDITING, PENDING, APPROVED, HIDDEN. - Allows a user to edit, park or approve a theme before making it site-wide.
- Logoimage:
A link to a image file that contains a logo. Should either be in PNG or GIF format.
- Logoimageretina:
Optional link to a image file that contains a logo. Should either be in PNG or GIF format and twice the dimensions of LogoImage.
- LogoWidth:
Width of the Logoimage - integer.
- LogoHeight:
Height of the Logoimage - integer.
Each user is related to just one theme.
Warning
Changing the core theme template string or title can cause problems with the template resolution. It is recommended that you copy and create a new theme.
Changing Theme for Login Page
The theme for the login page takes the most default of views, and thus you have to override the default theme in portal.conf and in the Web Interface.
Basically what needs to happen is (with a theme named devtheme):
Create folder under portal_themes called devtheme
Copy @portal_themes/core/templates/authentication/login.html@ to @portal_themes/devtheme/templates/authentication/login.html@
Copy @portal_themes/core/templates/base-frontpage.html@ to @portal_themes/devtheme/templates/base-frontpage.html@
Edit those files as you like.
Create new theme in the web interface called devtheme.
Set the new theme as a default theme in the web interface.
Logout.
Stop Cantemo.
Flush the cache. (
sudo valkey-cli -n 1 FLUSHDB)Start Cantemo.
Visit Cantemo and see your new login screen.
Images and Retina Images
Some of the images used in the core theme are sprites that set a background on the image. These sprites can be modified in the .less files that are included in Cantemo. A less mixin uses media queries build the correct css for targeting:
.image-2x(@image, @w: auto, @h: auto, @repeat: no-repeat) {
  background-image: url(@image);
  @image2x_path: ~`@{image}.replace(/\.\w+$/, function(match) { return "@2x" + match; })`;

  @media @mediaRetina {
    background-image: url("@{image2x_path}");
    background-size: @w @h;
  }
}
In Cantemo Core Theme we use a variable that assigns which sprite image to use, and later build that in to a mixin that can be used inside other CSS directives:
@menu-sprite: '@{static_sitemedia}img/sprite-menus.png';

.mxn-sprite(){
  .image-2x(@menu-sprite, 240px, 720px)
}
Other images are img tags and you can supply double size image versions by simply adding the data-src2x attribute to the image. JavaScript is then run on each page load to load up these 2x images. Example of an image tag:
<img src="/usermedia/img/Cantemo-logo@2x.png"
     data-src2x="/usermedia/img/Cantemo-logo@2x.png" width="225px"
     height="36px" border="0" alt="Cantemo"
     data-src-orig="/usermedia/img/Cantemo-logo.png">
The JavaScript function that is called looks for the data-src2x attribute and swaps the image. Width and Height are important and should be set to the original image size. This is the JavaScript function:
cntmo.utils.Retina.init()
If you need to create images you should create them in a subfolder named after you theme name, and general convention is the filename of the larger version contains “@2x.”.